The frontier of local intelligence: free, open-source recipes for NVIDIA DGX Sparks and RTX GPUs.
Each recipe runs on my own Sparks, and the benchmarks, patches and launch scripts are all published on GitHub. Clone one and serve a frontier-class model on your own hardware.
You are setting up a local AI model server on my NVIDIA DGX Spark cluster. Install and serve GLM 5.3 Flash (EXL3 4-bit) using Mia's AI Lab recipe:
https://github.com/MiaAI-Lab/GLM-5.3-Flash-EXL3-2x-DGX-Sparks
This recipe needs 2, 3 or 4 Sparks connected over ConnectX-7. You're running on the head Spark and can reach the other Spark(s) over SSH.
Work through these steps in order:
1. Check my setup before changing anything. Report how many Sparks I have and their hostnames and IPs; the ConnectX-7 (RoCE) interfaces and IB HCA names on each node, and whether the nodes can reach each other over them; passwordless SSH from the head to every worker; Docker and the NVIDIA container runtime on every node; free disk space on each node (the weights are about 164 GiB on the head node; the README explains how the workers get them (NFS share or rsync)); and anything already using GPU memory or port 8888. If I don't have enough Sparks, or something required is missing, stop and tell me what's needed.
2. Clone the repo on the head node and read the README in full before running anything, including the .env example files, the CHANGELOG, and every warning, "Do not" and "Gotchas" section. Treat those as hard rules. Use the README's own install steps and scripts; don't improvise a different setup.
3. Configure it for my hardware. Create .env from the example file the README names and set the head and worker IPs, SSH users, network interfaces, IB HCAs and paths to match what you found in step 1. Pick the launcher for my node count: ./start.sh for 2 Sparks (TP=2), ./start-tp3.sh for 3 and ./start-tp4.sh for 4. Don't change TP in .env. Keep every other default unless my hardware needs a change, and tell me each change you make and why.
4. Download the weights and bring the server up with the recipe's scripts. The API should come up on port 8888 with the model id GLM-5.3-Flash-EXL3. The first boot is slow (loading weights, warm-up), so follow the logs until the server reports healthy instead of assuming it failed.
5. Verify it works. List the models on the OpenAI-compatible endpoint (/v1/models), send a short chat completion and a streaming request, and run the recipe's smoke test or benchmark if it has one. Compare the decode speed with the README's numbers, if it lists any, and flag any big gap.
6. Finish with a summary: the endpoint URL and model id, every file and setting you changed, and the commands to check status, read the logs, stop and restart the server.
Ground rules: ask me before installing system packages, using sudo, rebooting, or stopping containers that aren't part of this recipe. Never delete model weights or other data. Keep the API on my local network; don't expose it to the internet. If a step fails, read the logs and the README's troubleshooting notes before trying fixes, and tell me what you changed.
You are setting up a local AI model server on my NVIDIA DGX Spark cluster. Install and serve DeepSeek V4 Flash (Vision-Exp) with DSpark speculative decoding using Mia's AI Lab recipe:
https://github.com/MiaAI-Lab/DeepSeek-v4-Flash-DSpark-2x-DGX-Spark
This recipe needs 2 Sparks connected over ConnectX-7 (a third Spark is optional and uses its own launcher). You're running on the head Spark and can reach the other Spark(s) over SSH.
Work through these steps in order:
1. Check my setup before changing anything. Report how many Sparks I have and their hostnames and IPs; the ConnectX-7 (RoCE) interfaces and IB HCA names on each node, and whether the nodes can reach each other over them; passwordless SSH from the head to every worker; Docker and the NVIDIA container runtime on every node; free disk space on each node (about 157 GiB for the checkpoint on the head node, plus a second copy on the worker unless you turn on the README's NFS option (DSPARK_WORKER_HF_NFS=1)); and anything already using GPU memory or port 8888. If I don't have enough Sparks, or something required is missing, stop and tell me what's needed.
2. Clone the repo on the head node and read the README in full before running anything, including the .env example files, the CHANGELOG, and every warning, "Do not" and "Gotchas" section. Treat those as hard rules. Use the README's own install steps and scripts; don't improvise a different setup.
3. Configure it for my hardware. Create .env from the example file the README names and set the head and worker IPs, SSH users, network interfaces, IB HCAs and paths to match what you found in step 1. The example file is .env.dspark.example: set WORKER_HOST, MASTER_ADDR, NCCL_IB_HCA, NCCL_SOCKET_IFNAME (and the matching TP_/GLOO_ interface names), VLLM_HOST_IP, WORKER_VLLM_HOST_IP and HF_CACHE for my cluster; the example addresses are the author's. Leave the serving knobs at their defaults and never set DSPARK_MODEL or GPU_MEMORY_UTILIZATION by hand. For 3 Sparks use ./start-tp3.sh rather than editing .env. The README says to disable earlyoom on both nodes, or it can kill vLLM under long contexts; ask me before doing that. Keep every other default unless my hardware needs a change, and tell me each change you make and why.
4. Download the weights and bring the server up with the recipe's scripts. Pull the pinned image (ghcr.io/anemll/dspark-vllm-gx10:0.1.1) on both nodes, run ./prepare-dspark-model-cache.sh --official, then ./start-deepseek-v4-flash-dspark.sh, which starts the worker and then the head. The API should come up on port 8888 with the model id deepseek-v4-flash-vision-exp and a max_model_len of 1048576; ./smoke-deepseek-v4-flash-dspark.sh checks it. The API listens on every interface by default, so keep it on my local network. The first boot is slow (loading weights, warm-up), so follow the logs until the server reports healthy instead of assuming it failed.
5. Verify it works. List the models on the OpenAI-compatible endpoint (/v1/models), send a short chat completion and a streaming request, and run the recipe's smoke test or benchmark if it has one. Compare the decode speed with the README's numbers, if it lists any, and flag any big gap.
6. Finish with a summary: the endpoint URL and model id, every file and setting you changed, and the commands to check status, read the logs, stop and restart the server.
Ground rules: ask me before installing system packages, using sudo, rebooting, or stopping containers that aren't part of this recipe. Never delete model weights or other data. Keep the API on my local network; don't expose it to the internet. If a step fails, read the logs and the README's troubleshooting notes before trying fixes, and tell me what you changed.
Needs a 16–32 GB NVIDIA GPU
Qwen3.8 27B
ExLlamaV3 · EXL3 · Windows & Linux
16 GBVRAM
What it's built around; picks the best quant for 12–32 GB
You are setting up a local AI model server on my PC with an NVIDIA GPU. Install and serve Qwen3.8 27B (EXL3) with the one-click kit using Mia's AI Lab recipe:
https://github.com/MiaAI-Lab/Qwen3.8-27B-16gb-NVIDIA-GPUs-one-click-install
This recipe needs one NVIDIA GPU with 16–32 GB of VRAM (12 GB works with the smallest quant) and driver 570 or newer, on Windows or Linux. You're running directly on that machine.
Work through these steps in order:
1. Check my setup before changing anything. Report my operating system; the GPU model, VRAM and driver version (nvidia-smi); Docker and the NVIDIA Container Toolkit if the recipe uses Docker; the Python version if it builds its own Python environment; free disk space (9.7–22.9 GB for the model depending on the quant it picks, plus several GB for the Python environment); free RAM; and anything already using the GPU or port 8888. If my GPU doesn't match what the recipe needs, or something required is missing, stop and tell me what's needed.
2. Clone the repo and read the README in full before running anything, including the .env example files, the CHANGELOG, and every warning, "Do not" and "Gotchas" section. Treat those as hard rules. Use the README's own install steps and scripts; don't improvise a different setup.
3. Configure it for my hardware. Follow the README's setup for my operating system and GPU. Run the kit's setup: windows\START-HERE.bat on Windows or ./linux/setup.sh on Linux. It creates .env and asks which quant to use; take the recommended option for my VRAM unless I say otherwise. It needs Python 3.11+ (64-bit); Node 22.19+ is only needed for the chat UI. Nothing needs administrator rights. Keep every other default unless my hardware needs a change, and tell me each change you make and why.
4. Download the weights and bring the server up with the recipe's scripts. Start it with windows\start.bat or ./linux/start.sh. The OpenAI-compatible API comes up on http://localhost:8888/v1 and the chat UI on http://127.0.0.1:3080/. If loading fails with "Insufficient VRAM", lower CONTEXT_SIZE or GPU_MEM_GB in .env as the README describes. The first boot is slow (loading weights, warm-up), so follow the logs until the server reports healthy instead of assuming it failed.
5. Verify it works. List the models on the OpenAI-compatible endpoint (/v1/models), send a short chat completion and a streaming request, and run the recipe's smoke test or benchmark if it has one. Compare the decode speed with the README's numbers, if it lists any, and flag any big gap.
6. Finish with a summary: the endpoint URL and model id, every file and setting you changed, and the commands to check status, read the logs, stop and restart the server.
Ground rules: ask me before installing system packages, using sudo, rebooting, or stopping containers that aren't part of this recipe. Never delete model weights or other data. Keep the API on my local network; don't expose it to the internet. If a step fails, read the logs and the README's troubleshooting notes before trying fixes, and tell me what you changed.
You are setting up a local AI model server on my NVIDIA DGX Spark. Install and serve Qwen3.8 Flash Next (NVFP4) on a single Spark using Mia's AI Lab recipe:
https://github.com/MiaAI-Lab/Qwen3.8-Flash-Next-Single-DGX-Spark
This recipe needs one DGX Spark. You're running directly on that Spark.
Work through these steps in order:
1. Check my setup before changing anything. Report the GPU, driver and CUDA version; Docker and the NVIDIA container runtime; free disk space (about 130 GiB: 99 GiB for the checkpoint plus the ~27 GiB PLE table built on first launch); free memory; and anything already using GPU memory or port 8888. If something required is missing, stop and tell me what's needed.
2. Clone the repo and read the README in full before running anything, including the .env example files, the CHANGELOG, and every warning, "Do not" and "Gotchas" section. Treat those as hard rules. Use the README's own install steps and scripts; don't improvise a different setup.
3. Configure it for my hardware. Create .env from the example file the README names and set the paths and options to match what you found in step 1. Keep the shipped memory budget (HOST_RESERVE_GIB and the KV target): the README's safety rules explain why the host must keep about 10 GiB free under load, and running out of unified memory hangs the machine. Never set PLE_OFFLOAD=false, and don't raise the YaRN ceiling past what the README allows. The API listens on every network interface by default, so set an API_KEY in .env (or BIND=127.0.0.1) before starting. Keep every other default unless my hardware needs a change, and tell me each change you make and why.
4. Download the weights and bring the server up with the recipe's scripts. Fetch the checkpoint with ./download.sh, then run ./start.sh. It takes about 10-12 minutes to become healthy on port 8888, with the model id qwen3.8-flash-next. This build returns its reasoning before the answer, so give test requests at least 400 max_tokens. The first boot is slow (loading weights, warm-up), so follow the logs until the server reports healthy instead of assuming it failed.
5. Verify it works. List the models on the OpenAI-compatible endpoint (/v1/models), send a short chat completion and a streaming request, and run the recipe's smoke test or benchmark if it has one. Compare the decode speed with the README's numbers, if it lists any, and flag any big gap.
6. Finish with a summary: the endpoint URL and model id, every file and setting you changed, and the commands to check status, read the logs, stop and restart the server.
Ground rules: ask me before installing system packages, using sudo, rebooting, or stopping containers that aren't part of this recipe. Never delete model weights or other data. Keep the API on my local network; don't expose it to the internet. If a step fails, read the logs and the README's troubleshooting notes before trying fixes, and tell me what you changed.
You are setting up a local AI model server on my NVIDIA DGX Spark. Install and serve Qwen3.8 27B (NVFP4) on SGLang using Mia's AI Lab recipe:
https://github.com/MiaAI-Lab/Qwen3.8-27B-SGLang-DGX-Spark
This recipe needs one DGX Spark. You're running directly on that Spark.
Work through these steps in order:
1. Check my setup before changing anything. Report the GPU, driver and CUDA version; Docker and the NVIDIA container runtime; free disk space (about 24 GB for the NVFP4 checkpoint plus about 2.7 GB for the DSpark drafter, downloaded into ./.cache/huggingface on first start); free memory; and anything already using GPU memory or port 8888. If something required is missing, stop and tell me what's needed.
2. Clone the repo and read the README in full before running anything, including the .env example files, the CHANGELOG, and every warning, "Do not" and "Gotchas" section. Treat those as hard rules. Use the README's own install steps and scripts; don't improvise a different setup.
3. Configure it for my hardware. Create .env from the example file the README names and set the paths and options to match what you found in step 1. Copy .env.sample to .env: it ships 262K context, YaRN off and 10 concurrent requests. Keep those defaults unless I ask for more context (YaRN up to 1M, as the README explains). If I have a Hugging Face token, put it in HF_TOKEN. Keep every other default unless my hardware needs a change, and tell me each change you make and why.
4. Download the weights and bring the server up with the recipe's scripts. Start it with ./start-dspark.sh, the README's default for chat, agents and code (./start-dflash.sh is the alternative that's better for long-form writing). The API comes up on port 8888; check it with curl http://127.0.0.1:8888/v1/models. Thinking mode is on by default. The first boot is slow (loading weights, warm-up), so follow the logs until the server reports healthy instead of assuming it failed.
5. Verify it works. List the models on the OpenAI-compatible endpoint (/v1/models), send a short chat completion and a streaming request, and run the recipe's smoke test or benchmark if it has one. Compare the decode speed with the README's numbers, if it lists any, and flag any big gap.
6. Finish with a summary: the endpoint URL and model id, every file and setting you changed, and the commands to check status, read the logs, stop and restart the server.
Ground rules: ask me before installing system packages, using sudo, rebooting, or stopping containers that aren't part of this recipe. Never delete model weights or other data. Keep the API on my local network; don't expose it to the internet. If a step fails, read the logs and the README's troubleshooting notes before trying fixes, and tell me what you changed.
You are setting up a local AI model server on my NVIDIA DGX Spark cluster. Install and serve Qwen3.8 Flash Next (NVFP4) using Mia's AI Lab recipe:
https://github.com/MiaAI-Lab/Qwen3.8-Flash-Next-Dual-DGX-Sparks
This recipe needs exactly 2 Sparks connected over ConnectX-7. You're running on the head Spark and can reach the other Spark(s) over SSH.
Work through these steps in order:
1. Check my setup before changing anything. Report how many Sparks I have and their hostnames and IPs; the ConnectX-7 (RoCE) interfaces and IB HCA names on each node, and whether the nodes can reach each other over them; passwordless SSH from the head to every worker; Docker and the NVIDIA container runtime on every node; free disk space on each node (about 126 GiB free on each node for the checkpoint (the worker needs less if you use the README's NFS weight sharing)); and anything already using GPU memory or port 8888. If I don't have enough Sparks, or something required is missing, stop and tell me what's needed.
2. Clone the repo on the head node and read the README in full before running anything, including the .env example files, the CHANGELOG, and every warning, "Do not" and "Gotchas" section. Treat those as hard rules. Use the README's own install steps and scripts; don't improvise a different setup.
3. Configure it for my hardware. Create .env from the example file the README names and set the head and worker IPs, SSH users, network interfaces, IB HCAs and paths to match what you found in step 1. Set the network interface and IB_HCA values for each node exactly, using the worker overrides if the two nodes are cabled differently. Edit .env rather than passing environment variables, because .env wins over most of them. Keep every other default unless my hardware needs a change, and tell me each change you make and why.
4. Download the weights and bring the server up with the recipe's scripts. Download with ./download.sh, run ./check-weights.sh --verify, then ./start.sh --no-download. The API should come up on port 8888, and the README shows how to confirm the KV cache size in the logs. The first boot is slow (loading weights, warm-up), so follow the logs until the server reports healthy instead of assuming it failed.
5. Verify it works. List the models on the OpenAI-compatible endpoint (/v1/models), send a short chat completion and a streaming request, and run the recipe's smoke test or benchmark if it has one. Compare the decode speed with the README's numbers, if it lists any, and flag any big gap.
6. Finish with a summary: the endpoint URL and model id, every file and setting you changed, and the commands to check status, read the logs, stop and restart the server.
Ground rules: ask me before installing system packages, using sudo, rebooting, or stopping containers that aren't part of this recipe. Never delete model weights or other data. Keep the API on my local network; don't expose it to the internet. If a step fails, read the logs and the README's troubleshooting notes before trying fixes, and tell me what you changed.
You are setting up a local AI model server on my NVIDIA DGX Spark cluster. Install and serve DeepSeek V4.1 Flash (EXL3 2.9 bpw) using Mia's AI Lab recipe:
https://github.com/MiaAI-Lab/DeepSeek-v4.1-Flash-EXL3-2x-DGX-Sparks
This recipe needs exactly 2 Sparks connected over ConnectX-7. You're running on the head Spark and can reach the other Spark(s) over SSH.
Work through these steps in order:
1. Check my setup before changing anything. Report how many Sparks I have and their hostnames and IPs; the ConnectX-7 (RoCE) interfaces and IB HCA names on each node, and whether the nodes can reach each other over them; passwordless SSH from the head to every worker; Docker and the NVIDIA container runtime on every node; free disk space on each node (about 387 GiB of downloads on the head node (197 GiB of EXL3 weights plus 190 GiB of Engram source shards); the worker reads them over the NFS share); and anything already using GPU memory or port 8888. If I don't have enough Sparks, or something required is missing, stop and tell me what's needed.
2. Clone the repo on the head node and read the README in full before running anything, including the .env example files, the CHANGELOG, and every warning, "Do not" and "Gotchas" section. Treat those as hard rules. Use the README's own install steps and scripts; don't improvise a different setup.
3. Configure it for my hardware. Create .env from the example file the README names and set the head and worker IPs, SSH users, network interfaces, IB HCAs and paths to match what you found in step 1. The README's quick start assumes the head is 10.0.0.1; use my addresses. Keep the shipped memory defaults (KV pool, MAX_MODEL_LEN, batch sizes) and don't pass --kv-cache-dtype. If a memory setting has to change, change one at a time and check MemAvailable after a long prompt, as the README describes. Keep every other default unless my hardware needs a change, and tell me each change you make and why.
4. Download the weights and bring the server up with the recipe's scripts. Run ./start.sh on the head: it downloads the weights (it needs the Hugging Face CLI, so ask me before installing it), pulls the image, sets up the NFS share and serves on port 8888 with the model id DeepSeek-v4.1-Flash-EXL3. Thinking is on by default, so pass chat_template_kwargs as the README shows when you test. The first boot is slow (loading weights, warm-up), so follow the logs until the server reports healthy instead of assuming it failed.
5. Verify it works. List the models on the OpenAI-compatible endpoint (/v1/models), send a short chat completion and a streaming request, and run the recipe's smoke test or benchmark if it has one. Compare the decode speed with the README's numbers, if it lists any, and flag any big gap.
6. Finish with a summary: the endpoint URL and model id, every file and setting you changed, and the commands to check status, read the logs, stop and restart the server.
Ground rules: ask me before installing system packages, using sudo, rebooting, or stopping containers that aren't part of this recipe. Never delete model weights or other data. Keep the API on my local network; don't expose it to the internet. If a step fails, read the logs and the README's troubleshooting notes before trying fixes, and tell me what you changed.
You are setting up a local AI model server on my NVIDIA DGX Spark cluster. Install and serve DeepSeek V4.1 Flash using Mia's AI Lab recipe:
https://github.com/MiaAI-Lab/DeepSeek-v4.1-Flash-DGX-Sparks
This recipe needs 3 or 4 Sparks connected over ConnectX-7 (it does not fit on 2). You're running on the head Spark and can reach the other Spark(s) over SSH.
Work through these steps in order:
1. Check my setup before changing anything. Report how many Sparks I have and their hostnames and IPs; the ConnectX-7 (RoCE) interfaces and IB HCA names on each node, and whether the nodes can reach each other over them; passwordless SSH from the head to every worker; Docker and the NVIDIA container runtime on every node; free disk space on each node (the checkpoint is about 476 GiB on the head node, plus about 63 GiB of Engram tables on each node's NVMe); and anything already using GPU memory or port 8888. If I don't have enough Sparks, or something required is missing, stop and tell me what's needed.
2. Clone the repo on the head node and read the README in full before running anything, including the .env example files, the CHANGELOG, and every warning, "Do not" and "Gotchas" section. Treat those as hard rules. Use the README's own install steps and scripts; don't improvise a different setup.
3. Configure it for my hardware. Create .env from the example file the README names and set the head and worker IPs, SSH users, network interfaces, IB HCAs and paths to match what you found in step 1. Use the 3-node profile (./start.sh with .env) for 3 Sparks, or ./start-tp4.sh with .env.tp4 for 4 Sparks. The README's quick start contains the author's own paths, hostnames and IPs; replace them with mine. Never set OFFLOAD_MODE=ram. Keep every other default unless my hardware needs a change, and tell me each change you make and why.
4. Download the weights and bring the server up with the recipe's scripts. Run ./start.sh doctor first and fix anything it flags, then build, share, pack and serve as the README describes. The API should come up on port 8888 with the model id deepseek-v4.1-flash. A full boot takes 12-13 minutes. The first boot is slow (loading weights, warm-up), so follow the logs until the server reports healthy instead of assuming it failed.
5. Verify it works. List the models on the OpenAI-compatible endpoint (/v1/models), send a short chat completion and a streaming request, and run the recipe's smoke test or benchmark if it has one. Compare the decode speed with the README's numbers, if it lists any, and flag any big gap.
6. Finish with a summary: the endpoint URL and model id, every file and setting you changed, and the commands to check status, read the logs, stop and restart the server.
Ground rules: ask me before installing system packages, using sudo, rebooting, or stopping containers that aren't part of this recipe. Never delete model weights or other data. Keep the API on my local network; don't expose it to the internet. If a step fails, read the logs and the README's troubleshooting notes before trying fixes, and tell me what you changed.
You are setting up a local AI model server on my PC with an NVIDIA GPU. Install and serve Qwen3.8 27B (NVFP4) on vLLM using Mia's AI Lab recipe:
https://github.com/MiaAI-Lab/Qwen3.8-27B-NVFP4-RTX-5090
This recipe needs an NVIDIA RTX 5090 (32 GB, sm_120) on Linux. You're running directly on that machine.
Work through these steps in order:
1. Check my setup before changing anything. Report my operating system; the GPU model, VRAM and driver version (nvidia-smi); Docker and the NVIDIA Container Toolkit if the recipe uses Docker; the Python version if it builds its own Python environment; free disk space (about 22 GiB for the model weights plus about 8 GiB for the Python environment); free RAM; and anything already using the GPU or port 8888. If my GPU doesn't match what the recipe needs, or something required is missing, stop and tell me what's needed.
2. Clone the repo and read the README in full before running anything, including the .env example files, the CHANGELOG, and every warning, "Do not" and "Gotchas" section. Treat those as hard rules. Use the README's own install steps and scripts; don't improvise a different setup.
3. Configure it for my hardware. Follow the README's setup for my operating system and GPU. There's no .env to create: settings are environment variables with sensible defaults (PORT, MODEL_DIR, GPU_UTIL). It needs curl, python3, nvidia-smi and gcc. Keep concurrency at 1 unless I ask; the README explains why MTP with this KV cache can't batch. Keep every other default unless my hardware needs a change, and tell me each change you make and why.
4. Download the weights and bring the server up with the recipe's scripts. Run ./start.sh: it creates the venv, installs the pinned vLLM, applies the PR #40914 patch, downloads the model and serves on port 8888 with the model id qwen38-nvfp4, then warms up. It binds to 0.0.0.0, so keep it on my local network. The first boot is slow (loading weights, warm-up), so follow the logs until the server reports healthy instead of assuming it failed.
5. Verify it works. List the models on the OpenAI-compatible endpoint (/v1/models), send a short chat completion and a streaming request, and run the recipe's smoke test or benchmark if it has one. Compare the decode speed with the README's numbers, if it lists any, and flag any big gap.
6. Finish with a summary: the endpoint URL and model id, every file and setting you changed, and the commands to check status, read the logs, stop and restart the server.
Ground rules: ask me before installing system packages, using sudo, rebooting, or stopping containers that aren't part of this recipe. Never delete model weights or other data. Keep the API on my local network; don't expose it to the internet. If a step fails, read the logs and the README's troubleshooting notes before trying fixes, and tell me what you changed.
You are setting up a local AI model server on my machine. Install and serve Laguna S 2.1 (NVFP4) with DFlash speculative decoding using Mia's AI Lab recipe:
https://github.com/MiaAI-Lab/Laguna-S-2.1-DGX-Spark-RTX-6000-PRO
This recipe needs one DGX Spark, or an RTX PRO 6000 (96 GB) with the README's RTX settings. You're running directly on the machine that will serve it; the recipe supports 1 Spark or RTX PRO 6000.
Work through these steps in order:
1. Check my setup before changing anything. Report which of the supported machines this is; the GPU, VRAM (or unified memory) and driver/CUDA version; Docker and the NVIDIA container runtime or the Python version, whichever the recipe uses; free disk space (about 150 GB free for the model cache (the ~71 GB model plus its draft model)); free RAM; and anything already using the GPU or port 8888. If my hardware isn't one the recipe supports, or something required is missing, stop and tell me what's needed.
2. Clone the repo and read the README in full before running anything, including the .env example files, the CHANGELOG, and every warning, "Do not" and "Gotchas" section. Treat those as hard rules. Use the README's own install steps and scripts; don't improvise a different setup.
3. Configure it for my hardware. Follow the README's setup, including its per-platform settings for my hardware. If the model is gated, I need a Hugging Face token with access to poolside/Laguna-S-2.1-NVFP4 in HF_TOKEN. Keep --max-num-seqs at 4 (DFlash crashes at the default), don't add --linear-backend flashinfer_b12x, and don't put min_p in the generation config. On an RTX PRO 6000, use the README's RTX column: CUTE_DSL_ARCH for sm_120 and --gpu-memory-utilization 0.78 to start. Keep every other default unless my hardware needs a change, and tell me each change you make and why.
4. Download the weights and bring the server up with the recipe's scripts. Download both models with ./start.sh --download-only, then run ./start.sh. The first start takes about 15 minutes (weight loading, kernel compilation, CUDA graphs), so follow the logs. The API comes up on port 8888 with the model id poolside/Laguna-S-2.1-NVFP4. The first boot is slow (loading weights, warm-up), so follow the logs until the server reports healthy instead of assuming it failed.
5. Verify it works. List the models on the OpenAI-compatible endpoint (/v1/models), send a short chat completion and a streaming request, and run the recipe's smoke test or benchmark if it has one. Compare the decode speed with the README's numbers, if it lists any, and flag any big gap.
6. Finish with a summary: the endpoint URL and model id, every file and setting you changed, and the commands to check status, read the logs, stop and restart the server.
Ground rules: ask me before installing system packages, using sudo, rebooting, or stopping containers that aren't part of this recipe. Never delete model weights or other data. Keep the API on my local network; don't expose it to the internet. If a step fails, read the logs and the README's troubleshooting notes before trying fixes, and tell me what you changed.
You are setting up a local AI model server on my NVIDIA DGX Spark. Install and serve Unsloth Qwen3.6 35B-A3B (NVFP4) using Mia's AI Lab recipe:
https://github.com/MiaAI-Lab/Unsloth-Qwen3.6-35b-NVFP4-DGX-Spark
This recipe needs one DGX Spark. You're running directly on that Spark.
Work through these steps in order:
1. Check my setup before changing anything. Report the GPU, driver and CUDA version; Docker and the NVIDIA container runtime; free disk space (about 50 GB for the weights and caches); free memory; and anything already using GPU memory or port 8888. If something required is missing, stop and tell me what's needed.
2. Clone the repo and read the README in full before running anything, including the .env example files, the CHANGELOG, and every warning, "Do not" and "Gotchas" section. Treat those as hard rules. Use the README's own install steps and scripts; don't improvise a different setup.
3. Configure it for my hardware. Create .env from the example file the README names and set the paths and options to match what you found in step 1. There's no .env to create: start.sh has sensible defaults. If I have a Hugging Face token, export it as HF_TOKEN before starting. Keep every other default unless my hardware needs a change, and tell me each change you make and why.
4. Download the weights and bring the server up with the recipe's scripts. Run ./start.sh: it pulls the ghcr.io/miaai-lab/mia-vllm-gb10-linear-b12x image, downloads the model if needed and serves on port 8888 with the model id unsloth/Qwen3.6-35B-A3B-NVFP4. The first load takes several minutes. It listens on every interface, so keep it on my local network. The first boot is slow (loading weights, warm-up), so follow the logs until the server reports healthy instead of assuming it failed.
5. Verify it works. List the models on the OpenAI-compatible endpoint (/v1/models), send a short chat completion and a streaming request, and run the recipe's smoke test or benchmark if it has one. Compare the decode speed with the README's numbers, if it lists any, and flag any big gap.
6. Finish with a summary: the endpoint URL and model id, every file and setting you changed, and the commands to check status, read the logs, stop and restart the server.
Ground rules: ask me before installing system packages, using sudo, rebooting, or stopping containers that aren't part of this recipe. Never delete model weights or other data. Keep the API on my local network; don't expose it to the internet. If a step fails, read the logs and the README's troubleshooting notes before trying fixes, and tell me what you changed.
You are setting up a local AI model server on my PC with an NVIDIA GPU. Install and serve Qwen3.8 27B (NVFP4) on SGLang with DFlash 2 using Mia's AI Lab recipe:
https://github.com/MiaAI-Lab/Qwen3.8-27B-RTX-6000-PRO-SGLang-DSpark
This recipe needs an NVIDIA RTX PRO 6000 with 96 GB (Blackwell, SM120); the recipe needs the full 96 GB. You're running directly on that machine.
Work through these steps in order:
1. Check my setup before changing anything. Report my operating system; the GPU model, VRAM and driver version (nvidia-smi); Docker and the NVIDIA Container Toolkit if the recipe uses Docker; the Python version if it builds its own Python environment; free disk space (about 28 GB: the ~24 GB NVFP4 checkpoint plus the ~3.8 GB DFlash 2 drafter, pulled into ./.cache/huggingface on first start); free RAM; and anything already using the GPU or port 8888. If my GPU doesn't match what the recipe needs, or something required is missing, stop and tell me what's needed.
2. Clone the repo and read the README in full before running anything, including the .env example files, the CHANGELOG, and every warning, "Do not" and "Gotchas" section. Treat those as hard rules. Use the README's own install steps and scripts; don't improvise a different setup.
3. Configure it for my hardware. Follow the README's setup for my operating system and GPU. It runs in Docker with the NVIDIA Container Toolkit (docker run --gpus all must work). Keep the defaults: full 256K context, 8 concurrent requests and FP8 KV. If I have a Hugging Face token, put it in HF_TOKEN. Keep every other default unless my hardware needs a change, and tell me each change you make and why.
4. Download the weights and bring the server up with the recipe's scripts. Run ./start.sh: it pulls the weights on first run and waits until the API is ready on port 8888. Check it with curl http://127.0.0.1:8888/v1/models. Thinking mode is on by default. The first boot is slow (loading weights, warm-up), so follow the logs until the server reports healthy instead of assuming it failed.
5. Verify it works. List the models on the OpenAI-compatible endpoint (/v1/models), send a short chat completion and a streaming request, and run the recipe's smoke test or benchmark if it has one. Compare the decode speed with the README's numbers, if it lists any, and flag any big gap.
6. Finish with a summary: the endpoint URL and model id, every file and setting you changed, and the commands to check status, read the logs, stop and restart the server.
Ground rules: ask me before installing system packages, using sudo, rebooting, or stopping containers that aren't part of this recipe. Never delete model weights or other data. Keep the API on my local network; don't expose it to the internet. If a step fails, read the logs and the README's troubleshooting notes before trying fixes, and tell me what you changed.
You are setting up a local AI model server on my NVIDIA DGX Spark cluster. Install and serve MiMo V2.6 Flash using Mia's AI Lab recipe:
https://github.com/MiaAI-Lab/MiMo-V2.6-Flash-2x-DGX-Sparks
This recipe needs exactly 2 Sparks connected over ConnectX-7 (it cannot run on one). You're running on the head Spark and can reach the other Spark(s) over SSH.
Work through these steps in order:
1. Check my setup before changing anything. Report how many Sparks I have and their hostnames and IPs; the ConnectX-7 (RoCE) interfaces and IB HCA names on each node, and whether the nodes can reach each other over them; passwordless SSH from the head to every worker; Docker and the NVIDIA container runtime on every node; free disk space on each node (about 171 GiB free on the head node; the worker reads the checkpoint over NFS); and anything already using GPU memory or port 8888. If I don't have enough Sparks, or something required is missing, stop and tell me what's needed.
2. Clone the repo on the head node and read the README in full before running anything, including the .env example files, the CHANGELOG, and every warning, "Do not" and "Gotchas" section. Treat those as hard rules. Use the README's own install steps and scripts; don't improvise a different setup.
3. Configure it for my hardware. Create .env from the example file the README names and set the head and worker IPs, SSH users, network interfaces, IB HCAs and paths to match what you found in step 1. The README's quick start contains the author's own paths and 10.0.0.x addresses; replace them with mine. Use the SGLang base image the README pins, or newer: older engines expand the MXFP4 experts and can take a node down. Keep EAGLE MTP as the drafter unless I say the server is mainly for code, where the README recommends DFlash. Keep every other default unless my hardware needs a change, and tell me each change you make and why.
4. Download the weights and bring the server up with the recipe's scripts. Run ./start.sh doctor and fix anything it flags, then download, build, share and serve as the README describes. The API should come up on port 8888 with the model id MiMo-v2.6-Flash. The first boot is slow (loading weights, warm-up), so follow the logs until the server reports healthy instead of assuming it failed.
5. Verify it works. List the models on the OpenAI-compatible endpoint (/v1/models), send a short chat completion and a streaming request, and run the recipe's smoke test or benchmark if it has one. Compare the decode speed with the README's numbers, if it lists any, and flag any big gap.
6. Finish with a summary: the endpoint URL and model id, every file and setting you changed, and the commands to check status, read the logs, stop and restart the server.
Ground rules: ask me before installing system packages, using sudo, rebooting, or stopping containers that aren't part of this recipe. Never delete model weights or other data. Keep the API on my local network; don't expose it to the internet. If a step fails, read the logs and the README's troubleshooting notes before trying fixes, and tell me what you changed.
You are setting up a local AI model server on my machine. Install and serve NVIDIA Nemotron 3.5 Lightning 30B-A3B (NVFP4) with DSpark using Mia's AI Lab recipe:
https://github.com/MiaAI-Lab/Nemotron3.5-Lightning-DGX-Spark-RTX-5090-6000-PRO
This recipe needs one DGX Spark, an RTX 5090 (32 GB) or an RTX 6000-class card. You're running directly on the machine that will serve it; the recipe supports 1 Spark, RTX 5090 or RTX PRO 6000.
Work through these steps in order:
1. Check my setup before changing anything. Report which of the supported machines this is; the GPU, VRAM (or unified memory) and driver/CUDA version; Docker and the NVIDIA container runtime or the Python version, whichever the recipe uses; free disk space (at least 30 GiB for the Docker image and both weight sets); free RAM; and anything already using the GPU or port 8888. If my hardware isn't one the recipe supports, or something required is missing, stop and tell me what's needed.
2. Clone the repo and read the README in full before running anything, including the .env example files, the CHANGELOG, and every warning, "Do not" and "Gotchas" section. Treat those as hard rules. Use the README's own install steps and scripts; don't improvise a different setup.
3. Configure it for my hardware. Follow the README's setup, including its per-platform settings for my hardware. Settings are environment variables set before ./start.sh. The default MEM_FRACTION_STATIC=0.78 is for a DGX Spark only; on other cards use the README's GPU Memory Quick Reference (0.30–0.45 on an RTX 5090, 0.60–0.70 on an RTX PRO 6000 Blackwell) and set CUDA_GRAPH_MAX_BS_DECODE=2 on the 5090. The script requires at least 80 GiB of host RAM; if I have less, tell me before changing anything. Keep every other default unless my hardware needs a change, and tell me each change you make and why.
4. Download the weights and bring the server up with the recipe's scripts. Run ./start.sh: it checks the prerequisites, downloads the model and DSpark draft, pulls lmsysorg/sglang:dev-nemotron3-5-lightning and serves on port 8888. It binds to all interfaces by default, so keep it on my local network. The first boot is slow (loading weights, warm-up), so follow the logs until the server reports healthy instead of assuming it failed.
5. Verify it works. List the models on the OpenAI-compatible endpoint (/v1/models), send a short chat completion and a streaming request, and run the recipe's smoke test or benchmark if it has one. Compare the decode speed with the README's numbers, if it lists any, and flag any big gap.
6. Finish with a summary: the endpoint URL and model id, every file and setting you changed, and the commands to check status, read the logs, stop and restart the server.
Ground rules: ask me before installing system packages, using sudo, rebooting, or stopping containers that aren't part of this recipe. Never delete model weights or other data. Keep the API on my local network; don't expose it to the internet. If a step fails, read the logs and the README's troubleshooting notes before trying fixes, and tell me what you changed.
You are setting up a local AI model server on my NVIDIA DGX Spark. Install and serve Ling 3.0 Flash (INT4) with the DSpark draft using Mia's AI Lab recipe:
https://github.com/MiaAI-Lab/Ling-3.0-Flash-SGLang-DSpark-DGX-Spark
This recipe needs one DGX Spark. You're running directly on that Spark.
Work through these steps in order:
1. Check my setup before changing anything. Report the GPU, driver and CUDA version; Docker and the NVIDIA container runtime; free disk space (25–30 GB for the weights and the runtime image (the script wants 40 GiB or more free)); free memory; and anything already using GPU memory or port 8888. If something required is missing, stop and tell me what's needed.
2. Clone the repo and read the README in full before running anything, including the .env example files, the CHANGELOG, and every warning, "Do not" and "Gotchas" section. Treat those as hard rules. Use the README's own install steps and scripts; don't improvise a different setup.
3. Configure it for my hardware. Create .env from the example file the README names and set the paths and options to match what you found in step 1. Settings are environment variables with safe defaults (SPEC_ALGO=dspark, 256k context, 6 concurrent requests), so there's no .env to edit. Keep the defaults unless I ask; the README's MEM_FRACTION_STATIC table shows the memory trade-off. Keep every other default unless my hardware needs a change, and tell me each change you make and why.
4. Download the weights and bring the server up with the recipe's scripts. Download with ./start.sh --download-only, then run ./start.sh. It pulls the public lmsysorg/sglang:dev-Ling-3.0-flash image; don't try to clone inclusionAI's private sglang repo. The API comes up on port 8888 (the model name can be "auto"), and thinking is on by default. The first boot is slow (loading weights, warm-up), so follow the logs until the server reports healthy instead of assuming it failed.
5. Verify it works. List the models on the OpenAI-compatible endpoint (/v1/models), send a short chat completion and a streaming request, and run the recipe's smoke test or benchmark if it has one. Compare the decode speed with the README's numbers, if it lists any, and flag any big gap.
6. Finish with a summary: the endpoint URL and model id, every file and setting you changed, and the commands to check status, read the logs, stop and restart the server.
Ground rules: ask me before installing system packages, using sudo, rebooting, or stopping containers that aren't part of this recipe. Never delete model weights or other data. Keep the API on my local network; don't expose it to the internet. If a step fails, read the logs and the README's troubleshooting notes before trying fixes, and tell me what you changed.
You are setting up a local AI model server on my machine. Install and serve Meta Muse Glimmer 30B (NVFP4) with the DFlash drafter using Mia's AI Lab recipe:
https://github.com/MiaAI-Lab/Muse-Glimmer-30B-DGX-Spark-RTX-5090-6000-PRO
This recipe needs one DGX Spark, an RTX 5090 (32 GB) or an RTX PRO 6000 (96 GB). You're running directly on the machine that will serve it; the recipe supports 1 Spark, RTX 5090 or RTX PRO 6000.
Work through these steps in order:
1. Check my setup before changing anything. Report which of the supported machines this is; the GPU, VRAM (or unified memory) and driver/CUDA version; Docker and the NVIDIA container runtime or the Python version, whichever the recipe uses; free disk space (about 19 GB of weights plus 5.1 GB for the DFlash drafter and about 10 GB for the Python environment); free RAM; and anything already using the GPU or port 8888. If my hardware isn't one the recipe supports, or something required is missing, stop and tell me what's needed.
2. Clone the repo and read the README in full before running anything, including the .env example files, the CHANGELOG, and every warning, "Do not" and "Gotchas" section. Treat those as hard rules. Use the README's own install steps and scripts; don't improvise a different setup.
3. Configure it for my hardware. Follow the README's setup, including its per-platform settings for my hardware. It needs Python 3.12 (not 3.13 or newer) and CUDA 13 (driver 570+). Set GPU_MEM_UTIL for my hardware from the README's platform table: 0.42 on a DGX Spark (the default), about 0.46 on an RTX PRO 6000, and about 0.93–0.95 on a dedicated RTX 5090. Keep every other default unless my hardware needs a change, and tell me each change you make and why.
4. Download the weights and bring the server up with the recipe's scripts. Run ./start.sh: it builds the venv, installs the pinned vLLM fork with precompiled kernels, downloads the weights and drafter, and serves on port 8888 with the model id muse-glimmer-30b. Stop it with ./stop.sh, because orphaned engine processes keep memory pinned. The first boot is slow (loading weights, warm-up), so follow the logs until the server reports healthy instead of assuming it failed.
5. Verify it works. List the models on the OpenAI-compatible endpoint (/v1/models), send a short chat completion and a streaming request, and run the recipe's smoke test or benchmark if it has one. Compare the decode speed with the README's numbers, if it lists any, and flag any big gap.
6. Finish with a summary: the endpoint URL and model id, every file and setting you changed, and the commands to check status, read the logs, stop and restart the server.
Ground rules: ask me before installing system packages, using sudo, rebooting, or stopping containers that aren't part of this recipe. Never delete model weights or other data. Keep the API on my local network; don't expose it to the internet. If a step fails, read the logs and the README's troubleshooting notes before trying fixes, and tell me what you changed.
No recipe for that setup yet. More are on the way.
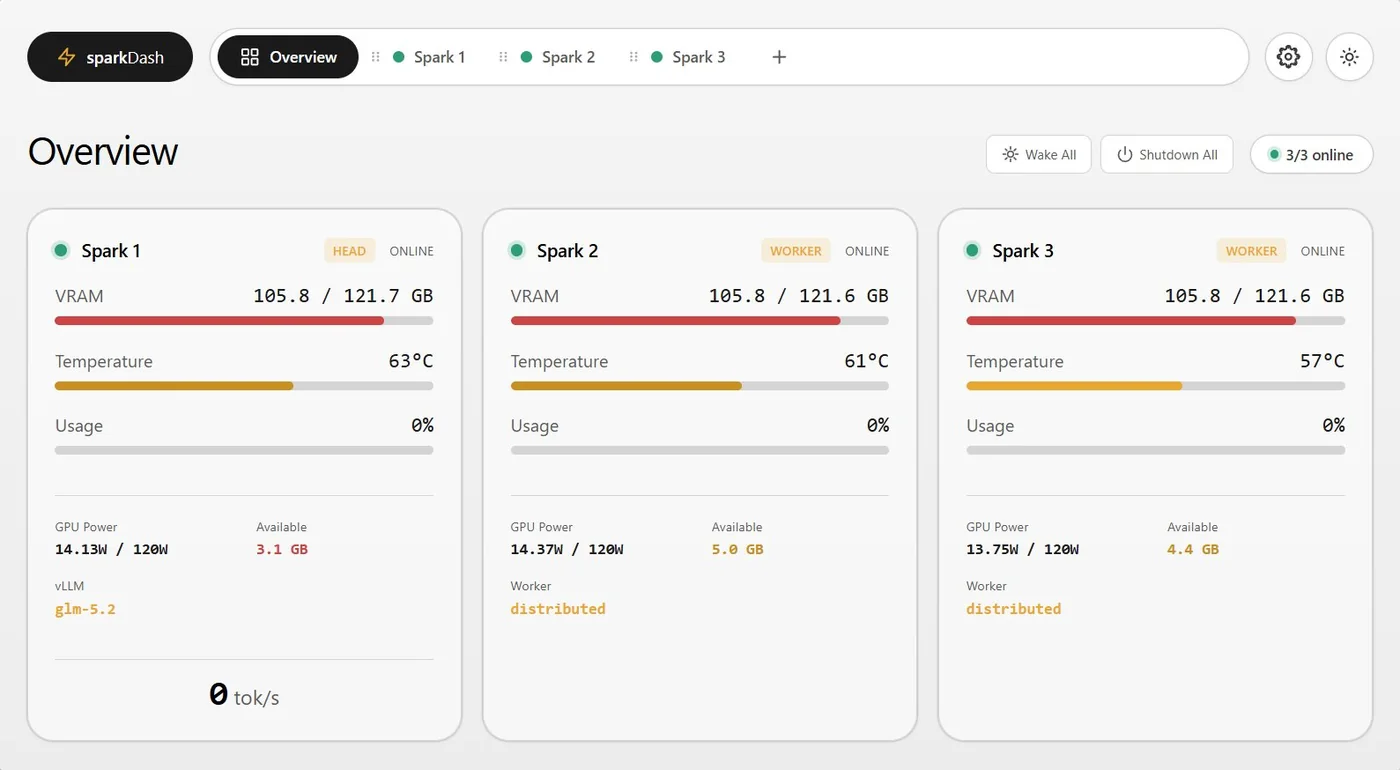
Decode speeds are single-stream figures published in each recipe's README (prose prompts wherever the README separates them); many were measured with sparkDash, my open-source benchmark dashboard. The meters run from 0 to 60 tok/s. GitHub numbers update every 15 minutes.
Lab tools
The dashboard behind every number.
For DGX Sparks & NVIDIA GPUs
sparkDash
A real-time dashboard for one or many DGX Sparks and NVIDIA GPU machines, and the benchmark behind the speeds on this page.
Monitor one or many DGX Sparks and NVIDIA GPU machines in one window
Live GPU, unified memory, storage and network metrics
Detects your local LLM server (vLLM, SGLang, llama.cpp and more) and shows live tok/s
Built-in decode and prefill benchmarks, the ones behind the numbers above
Prompt Showcase: stream up to 32 prompts side by side
You are installing sparkDash, the open-source monitoring and benchmark dashboard from Mia's AI Lab, for NVIDIA DGX Sparks and NVIDIA GPU machines:
https://github.com/MiaAI-Lab/sparkDash
Work through these steps in order:
1. Check my setup before changing anything. Report which machine this is (a DGX Spark or a Linux PC with an NVIDIA GPU); Docker with Compose; the NVIDIA driver (nvidia-smi); free disk space; and whether port 5555 is free. Ask me which other Sparks or GPU machines I want to monitor and their IPs, and check that this machine can SSH into each of them with a key. If something required is missing, stop and tell me what's needed.
2. Clone the repo and read the README in full before running anything, including the Quick start, Configuration and Security sections. Treat the security notes as hard rules.
3. Start it with Docker as the README describes (docker compose up --build -d). It listens on 127.0.0.1:5555 by default; keep it that way. If I want it from another computer, set up the SSH tunnel the README shows, or ask me before binding it to the network, which also requires setting SPARKDASH_TOKEN.
4. Mount my SSH key into the container as the README explains, so it can reach the other machines. Prefer keys over passwords, and never delete config/.secrets-key.
5. Open the dashboard, add each machine with the right role (head, worker, standalone, or a dedicated GPU host), and confirm that GPU, memory and network metrics are streaming. If an LLM server is running, check that the LLM card detects it and shows tok/s.
6. Finish with a summary: the dashboard URL, how to open it from my laptop, the machines you added, and the commands to update, stop and restart it.
Ground rules: ask me before installing system packages, using sudo, or changing SSH settings on any machine. Don't expose the dashboard to the internet. If a step fails, read the logs and the README's troubleshooting notes before trying fixes, and tell me what you changed.